![]()
![]()
Read this in other languages: English, Polski, Português
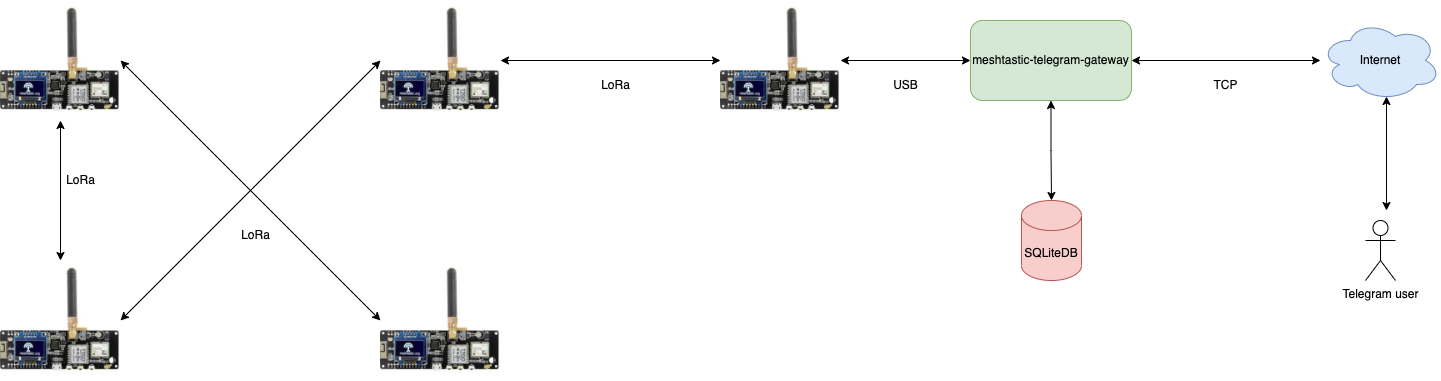
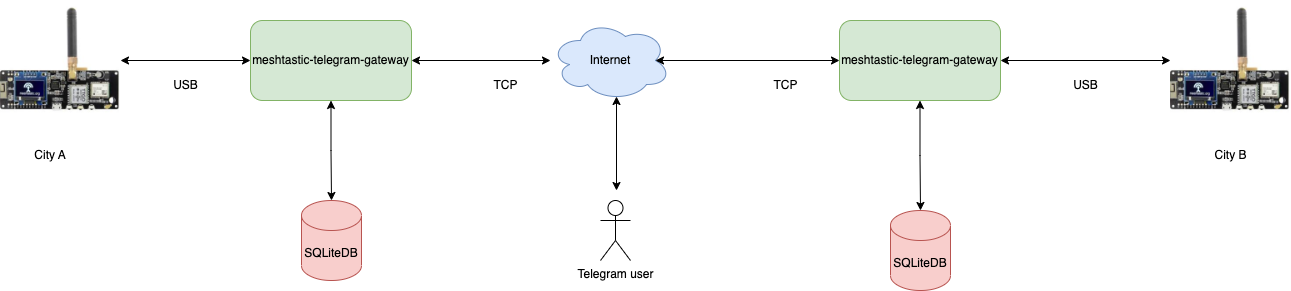
Telegram bot that forwards messages to and from Meshtastic device
The purpose of this bot is to act as a bridge between local Meshtastic conference and Telegram chat room. Nicks (Your Name field for Meshtastic) are passed through in both directions.
See official Meshtastic Python list


Legend:
- R - Radio only. With good setup (height + something similar to Diamond X510)
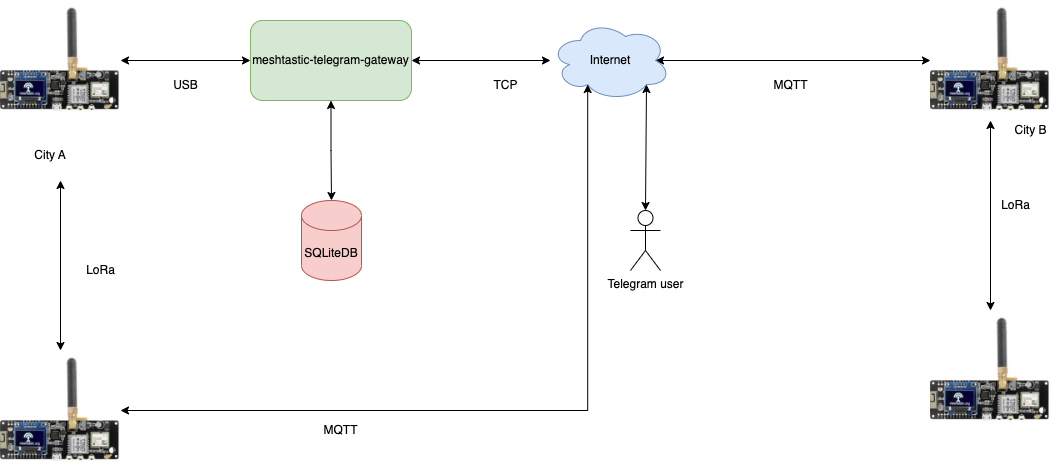
- M - Radio (with some Baofeng-like antenna) + MQTT
- C - Radio only. Mobile clients
Python 3.9+ is required.
When enabled, this bot listens on specified port and renders device map.
- Cluster markerer
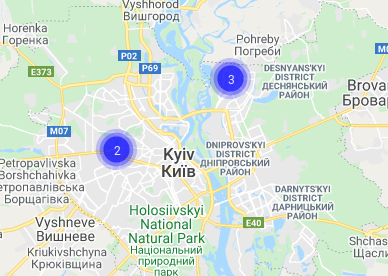
- Device details
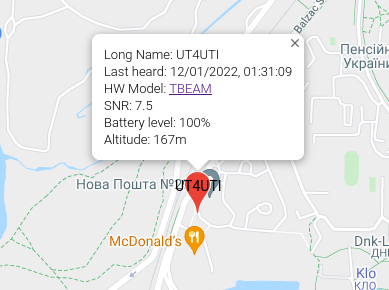
- Actual Kyiv community map
- Tail duration
Default value is 3600 seconds. Can be changed using ?tail=xxx query string, e.g.
https://mesh.0x21h.net/?tail=7200
- Run
cat mesh.ini.example|egrep -v '^#' > mesh.ini - Create new Telegram bot using @BotFather contact. Copy token to clipboard.
- Put token from previous step into
mesh.ini - Put admin id and room id into
mesh.ini - Edit
mesh.iniMeshtastic section to reflect your device configuration (usually not required, for Linux at least) - Run
sudo pip3 install -r requirements.txt - Run
gpasswd -a youruser dialout - Relogin
- On Raspberry Pi and other always-on hosts, use
systemdas the primary deployment method. - For a manual legacy session, run
/start.sh - Enjoy
There are currently three supported deployment styles in this repository:
-
systemdservice Recommended for always-on hosts such as Raspberry Pi. The service usually runs the same long-lived./mesh.py run -c ./mesh.iniloop thatmake runuses, but lets the OS manage startup, restart, and logs. -
start.sh/screenLegacy simple deployment for manual hosts../start.shlaunches the gateway and monitor in detachedscreensessions. -
Docker Compose Use
docker compose up --build -dwhen you want containerized deployment.
If you maintain both docs and infrastructure, prefer documenting which one is authoritative for each host.
For example, the Raspberry Pi deployment in this repo is managed by systemd, even though start.sh is still available as a manual fallback.
git pull --ff-only
pip3 install -r requirements.txt
sudo systemctl restart meshtastic-mesh.service
sudo systemctl status meshtastic-mesh.servicegit pull --ff-only
pip3 install -r requirements.txt
./start.sh
screen -lsgit pull --ff-only
docker compose up --build -d
docker compose ps/start- basic command to confirm that bot is up and running/nodes- return list of known nodes (including those reachable via other hops)/qr- return active QR code for configuring new Meshtastic devices/map- return link to map
/distance- print distance to other Meshtastic devices (in meters) Sample answer:
UR5YBM-aa60: 19m
UT3ULJ: 2,316m
/ping- ping currently connected Meshtastic node and get response. Sample answer:
Pong from UR5YBM-aa60 at 10.00 SNR time=9.632s
/stats- get some stats for current node Sample anwser:
Locations: 1234. Messages: 20
/reboot - request Meshtastic device reboot. Requires respective admin privileges.
/uptime - returns bot version/uptime
$ ./mesh.py --help

usage: mesh.py [-h] {post2mesh,run,command} ...

optional arguments:
  -h, --help            show this help message and exit

commands:
  {post2mesh,run,command}
                        commands
    post2mesh           site command
    run                 run
    command             Send command
Sending messages to Meshtastic device:
$ ./mesh.py post2mesh -m "test"
Sending commands to Meshtastic device:
$ ./mesh.py command -c reboot
This bot has experimental support for MQTT-only mode.
If you want to use the bot without Meshtastic hardware, you need to edit mqtt.ini file and
enable MQTT section in mesh.ini file.
This requires setting [Meshtastic] section device to mqtt.
This bot provides bi-directional text messaging with APRS nodes using APRS-IS. Meshtastic nodes with valid amateur call signs will be announced to APRS network. See
[APRS] configuration section.
- Store your plugin in external/plugins, along with an empty
__init__.py - Note that
ExternalBaseparent class is for dynamic plugin loading. NoHandlermethods will be called, but you will have access to bot connections. - Sample
import asyncio

class Handler:
  def __init__(self, database, config, meshtastic_connection, telegram_connection, logger):
    self.database = database
    self.config = config
    self.meshtastic_connection = meshtastic_connection
    self.telegram_connection = telegram_connection
    self.logger = logger

  async def main(self):
    self.logger.info('Server started...')
    while True:
      try:
        await asyncio.sleep(1)
      except Exception as exc:
        pass

class FooBar(ExternalBase):
    def __init__(self, database, config, meshtastic_connection, telegram_connection, logger):
        # Init handler
        self.handler = Handler(database, config, meshtastic_connection, telegram_connection, logger)

    def run(self):
        asyncio.run(self.handler.main())