FRC Team 6238 Popcorn Penguins CAM Post-Processor
A web-based tool for FRC robotics teams to automatically generate CNC G-code from Onshape designs. No CAM software required!
🔗 Demo video:
🔗 Live app: https://penguincam.popcornpenguins.com
PenguinCAM streamlines the workflow from CAD design to CNC machining for FRC teams:
- Design in Onshape → Create flat plates with holes and pockets
- Right-click → "Send to PenguinCAM" → One-click export from Onshape
- Orient & Generate → Rotate part, auto-generate toolpaths
- Download or Save to Drive → Ready to run on your CNC router
No CAM software, no manual exports, no face selection required! PenguinCAM knows what FRC teams need.
Designed to feel like 3D printer slicers or laser cutter software. Get the design, orient it on the machine, and go. Launching directly from Onshape means no export/import steps, lost files or inconsistent naming.
✅ Automatic hole detection:
- All circular holes (preserves exact CAD dimensions)
- #10 screw holes, bearing holes, or custom sizes
- Helical entry + spiral clearing strategy
✅ Smart perimeter cutting of plates:
- Holding tabs prevent parts from flying away
- Configurable tab count
✅ Pocket recognition:
- Auto-detects inner boundaries
- Generates clearing toolpaths
✅ Aluminum tubing support:
- Tube mounts in tubing jig
- No X/Y zeroing required
- Flip part halfway through
- Automatically squares off near end
- Automatically cuts tube to CAD length
- Pattern mirrored and cut in both top and bottom faces
One-Click Export from Onshape:
- Right-click part in Onshape → "Send to PenguinCAM"
- Auto-detects top face
- Opens PenguinCAM with part already loaded
- No manual DXF export or face selection needed
How to Set Up:
- Install PenguinCAM extension in your Onshape classroom
- Extension appears in right-click "Applications" menu on parts
- Click once to send part directly to PenguinCAM
- OAuth authentication (one-time per team member)
Alternative: Manual DXF upload available for offline work
- Google Workspace authentication
- Restrict to your domain (e.g., @popcornpenguins.com)
- Secure OAuth 2.0 login
- Upload G-code directly to team Shared Drive
- Easily accessible from CNC computer
- All team members can access files
- Files persist when students graduate
2D Setup View:
- Orient your part before generating G-code
- Rotate in 90° increments to match stock orientation
- Origin automatically set to bottom-left (X→ Y↑)
- Familiar workflow for 3D printer slicer / laser cutter users
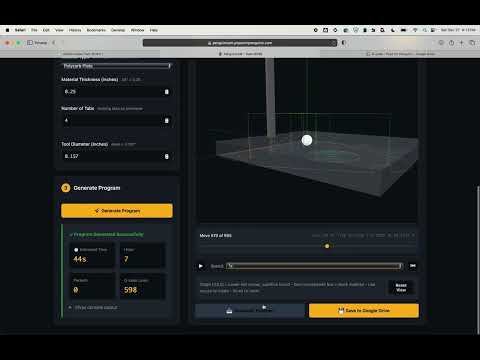
3D Toolpath Preview:
- Interactive preview with cutting tool animation
- Scrubber to step through each move
- See completed vs. upcoming cuts
- Verify toolpath for holes, pockets, and perimeter
One-Click Workflow:
- Design your part in Onshape (flat plate with holes/pockets)
- Right-click the part in the feature tree
- Click "Send to PenguinCAM" from the Applications menu item
- Orient your part - Rotate if needed in 2D setup view
- Click "Generate Program" - Review 3D preview
- Download or save to Drive - Ready for CNC!
First Time Setup: You'll be asked to authenticate with Google (one time per team member)
For offline work or non-Onshape files:
- Export DXF from your CAD software
- Visit https://penguincam.popcornpenguins.com
- Upload DXF file via drag-and-drop
- Orient & generate - Same as above
- Download or save to Drive
- Load G-code into your Mach4 on the CNC controller
- Set up material and zero axes (see Quick Reference)
- Run the program!
PenguinCAM is deployed on Railway with automatic GitHub integration.
Setup guides:
- Deployment Guide - Deploy to Railway, environment variables
- Authentication Guide - Google OAuth and Workspace setup
- Integrations Guide - Onshape and Google Drive configuration
- Onshape Extension Setup - Install one-click export in Onshape ⭐
For daily use:
- Quick Reference Card - Cheat sheet for students and mentors
Technical references:
- Z-Coordinate System - Sacrifice board zeroing explained
Planning:
- Roadmap - Future features and improvements
Runtime dependencies:
Flask>=3.0.0
gunicorn>=21.2.0
requests>=2.31.0
ezdxf>=1.0.0
shapely>=2.0.0
google-auth>=2.23.0
google-auth-oauthlib>=1.1.0
google-api-python-client>=2.100.0
See requirements.txt for complete list.
Onshape Part Studio
    ↓ (OAuth API)
DXF Export
    ↓ (Automatic face detection)
Geometry Analysis
    ↓ (Hole detection, path generation)
G-code Generation
    ↓ (Tool compensation)
3D Preview + Download
    ↓ (Optional)
Google Drive Upload
Backend (Python):
frc_cam_gui_app.py- Flask web serverfrc_cam_postprocessor.py- G-code generation engineonshape_integration.py- Onshape API clientgoogle_drive_integration.py- Drive uploadspenguincam_auth.py- Google OAuth authentication
Frontend:
templates/index.html- Web interface with Three.js visualizationstatic/popcornlogo.png- Team branding
Configuration:
Procfile- Railway deployment configrequirements.txt- Python dependencies- Environment variables - Secrets and API keys
PenguinCAM generates optimized toolpaths:
-
Holes (all sizes):
- Helical entry from center
- Spiral clearing to final diameter
- Compensated for exact CAD dimensions
- Works for #10 screws, bearings, or custom
-
Pockets:
- Offset inward by tool radius
- Helical entry, then clearing passes
- Spiral strategy for circular pockets
-
Perimeter:
- Offset outward by tool radius
- Cut with holding tabs
Z=0 is at the SACRIFICE BOARD (bottom), not material top.
This ensures:
- ✅ Consistent Z-axis setup across jobs
- ✅ Guaranteed cut-through (0.02" overcut)
- ✅ No math required when changing material thickness
See Z_COORDINATE_SYSTEM.md for details.
Material:
- Thickness: 0.25" (configurable)
- Sacrifice board overcut: 0.02"
Tool:
- Diameter: 0.157" (4mm endmill)
- Common alternatives: 1/8" (0.125"), 1/4" (0.250")
Feeds & Speeds:
- Feed rate: 30 IPM
- Plunge rate: 10 IPM
- Safe height: 0.1" above material top
Tabs:
- Count: 4 (evenly spaced)
- Width: 0.25"
- Height: 0.03" (material left in tab)
These can be customized in the code for your specific machine and materials.
penguincam/
├── README.md                      # This file
├── ROADMAP.md                     # Future plans
├── requirements.txt               # Python dependencies
├── Procfile                       # Railway deployment
│
├── docs/                          # Documentation
│   ├── DEPLOYMENT_GUIDE.md        # Setup & deployment
│   ├── AUTHENTICATION_GUIDE.md    # Google OAuth
│   ├── INTEGRATIONS_GUIDE.md      # Onshape & Drive
│   ├── quick-reference-card.md    # Quick start
│   ├── TOOL_COMPENSATION_GUIDE.md # Technical reference
│   └── Z_COORDINATE_SYSTEM.md     # Zeroing guide
│
├── static/                        # Static assets
│   └── popcornlogo.png            # Team logo
│
├── templates/                     # HTML templates
│   └── index.html                 # Main web interface
│
├── frc_cam_gui_app.py            # Flask web server
├── frc_cam_postprocessor.py      # G-code generator
├── onshape_integration.py        # Onshape API
├── google_drive_integration.py   # Drive uploads
├── penguincam_auth.py            # OAuth authentication
│
└── [config files...]              # Various JSON configs
We use uv for fast Python dependency management. This works well with git worktrees since packages are cached globally.
-
Clone repository:
git clone https://github.com/your-team/penguincam.git cd penguincam -
Install dependencies:
make install
This installs
uvif needed, creates a.venv, and installs all dependencies. -
Run G-code tests:
make test -
Set environment variables (for running the web app):
export GOOGLE_CLIENT_ID=your-client-id
export GOOGLE_CLIENT_SECRET=your-secret
export ONSHAPE_CLIENT_ID=your-onshape-id
export ONSHAPE_CLIENT_SECRET=your-onshape-secret
export BASE_URL=http://localhost:6238
export AUTH_ENABLED=false  # Skip auth for local testing
-
Run locally:
uv run python frc_cam_gui_app.py
-
Visit: http://localhost:6238
Push to main branch → Railway auto-deploys
See DEPLOYMENT_GUIDE.md for complete setup.
PenguinCAM was built for FRC Team 6238 but is open for other teams to use and improve!
Ideas welcome:
- Multiple parts in a single job
- More sophisticated pocket clearing
- Better tab algorithms
See ROADMAP.md for planned features.
This project is licensed under the MIT License.
Built by FRC Team 6238 Popcorn Penguins
For questions or support:
- GitHub Issues: https://github.com/6238/PenguinCAM/issues
- Team mentor: Josh Sirota [email protected]
Interested in using PenguinCAM for your team? Great!
Setup steps:
- Fork this repository
- Follow DEPLOYMENT_GUIDE.md to deploy on Railway
- Configure Google OAuth for your Workspace
- Set up Onshape API credentials
- Customize for your team (logo, domain, etc.)
The setup takes about 1-2 hours but then requires minimal maintenance. Your students will love the streamlined workflow!
Go Popcorn Penguins! 🍿🐧