Once you've confirmed that your Custom Vision API is working correctly using either Python code or Postman, the next step is to integrate it into your own service or application. The key advantage of using Azure's Cloud AI services is the ease with which they can be scaled and integrated into various platforms and languages.
- Working Custom Vision model with a published endpoint
- Prediction-Key for authentication
- Language-specific libraries or SDKs for making HTTP requests (like Python’s
requestsor JavaScript'sfetch)
-
Initialize HTTP Client:
In your backend service, first initialize an HTTP client that you will use to communicate with the Azure API.
import requests -
Set Up Configuration:
Define constants or environment variables for the endpoint URL and the Prediction-Key.
PREDICTION_KEY = "12861a3a1xxxxxxxxxxxxxxxx" ENDPOINT_URL = "https://eastus.api.cognitive.microsoft.com/customvision/v3.0/Prediction/projectname/classify/iterations/imagenetAzure/image" -
API Call Function:
Create a function that makes an API call to the Custom Vision service.
def classify_image(image_data): headers = { "Prediction-Key": PREDICTION_KEY, "Content-Type": "application/octet-stream" } response = requests.post(ENDPOINT_URL, headers=headers, data=image_data) return response.json() -
Integrate into Logic:
Integrate the above function where needed in your application logic. For example, you might call
classify_imagewhen a user uploads a new image. -
Handle Response:
Once the API call returns a response, you can parse the JSON to obtain the classification labels and confidence scores.
def process_results(result):
    for label in result:
print(f"Label: {label['tagName']}, Confidence: {label['probability']}")FastAPI is a modern, fast web framework for building APIs with Python 3.7+ based on standard Python type hints. It's an excellent choice for wrapping your interactions with Azure Custom Vision into a RESTful API service.
- Install FastAPI:
pip install fastapi - Install an ASGI server like Uvicorn:
pip install uvicorn
-
Create a New Python File:
Create a new Python file for your FastAPI application, for example,
main.py. -
Import FastAPI and Initialize:
from fastapi import FastAPI

app = FastAPI()
You'll need the function to interact with Azure Custom Vision, similar to the one we discussed earlier. Let's assume you have a function called classify_image(image_data) that takes an image binary as input and returns Azure API's JSON response.
import requests

PREDICTION_KEY = "12861a3a1xxxxxxxxxxxxxxxx"
ENDPOINT_URL = "https://eastus.api.cognitive.microsoft.com/customvision/v3.0/Prediction/projectname/classify/iterations/imagenetAzure/image"

def classify_image(image_data):
    headers = {
        "Prediction-Key": PREDICTION_KEY,
        "Content-Type": "application/octet-stream"
    }
    response = requests.post(ENDPOINT_URL, headers=headers, data=image_data)
    return response.json()
-
Create an Endpoint for Classifying an Image:
You'll need to import FastAPI's
FileandUploadFilefor file upload functionality.from fastapi import FastAPI, File, UploadFile @app.post("/classify/") async def upload_file(file: UploadFile = File(...)): image_data = await file.read() result = classify_image(image_data) return result
This FastAPI endpoint listens to POST requests at /classify/ and expects a file upload. The uploaded file is read into image_data, which is then sent to classify_image() for getting the classification result.
-
Run Using Uvicorn:
Open your terminal, navigate to the folder where
main.pyis located, and run:uvicorn main:app --reload
You should see output indicating that the server is running. By default, it will be hosted at http://127.0.0.1:8000/.
You can now use Postman or curl to send a POST request to http://127.0.0.1:8000/classify/ with a file attached to see if you get the expected classification result from Azure Custom Vision.
By integrating Azure Custom Vision with FastAPI, you can create a robust, scalable, and flexible RESTful API service that not only interacts with Azure's powerful AI capabilities.
SwaggerHub is a platform for API design and documentation. One of the key benefits of using FastAPI is its built-in support for generating interactive API documentation via Swagger UI, which can then be exported to SwaggerHub for more collaborative work on the API.
- A running FastAPI service.
- An account on SwaggerHub.
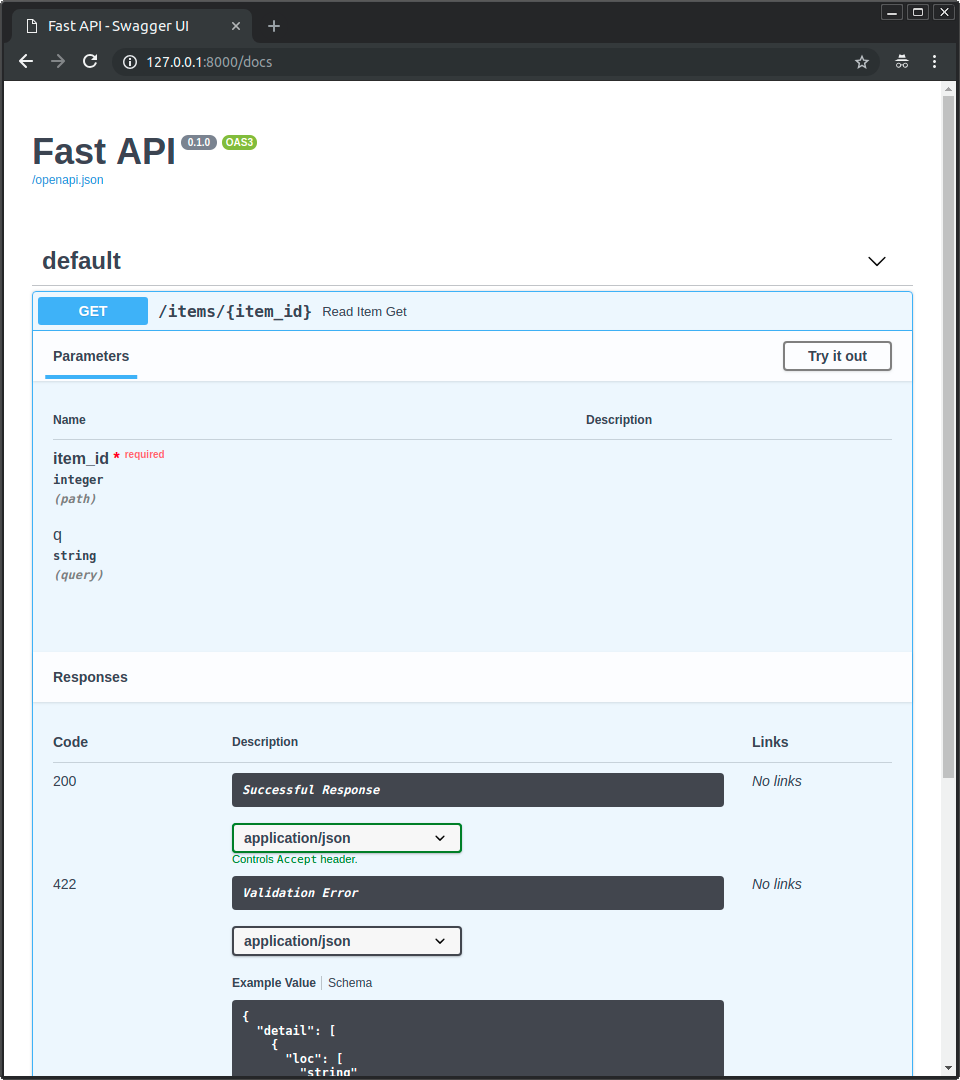
FastAPI auto-generates Swagger documentation for your API. To access it, run your FastAPI project and navigate to http://127.0.0.1:8000/docs in your browser. At this URL, you'll see the Swagger UI, providing an interactive interface to test your API.
To export the Swagger JSON:
- On the Swagger UI interface at
http://127.0.0.1:8000/docs, you'll find a button at the top that saysExport -> JSON. - Click it to download the Swagger JSON schema.
- Login to SwaggerHub: Open your browser and go to SwaggerHub. Log in or sign up for an account if you don't already have one.
- Create a New API: On the dashboard, click on the
Create New->APIbutton. - Import the JSON File: You'll see an option to import an API definition. Upload the downloaded Swagger JSON file here.
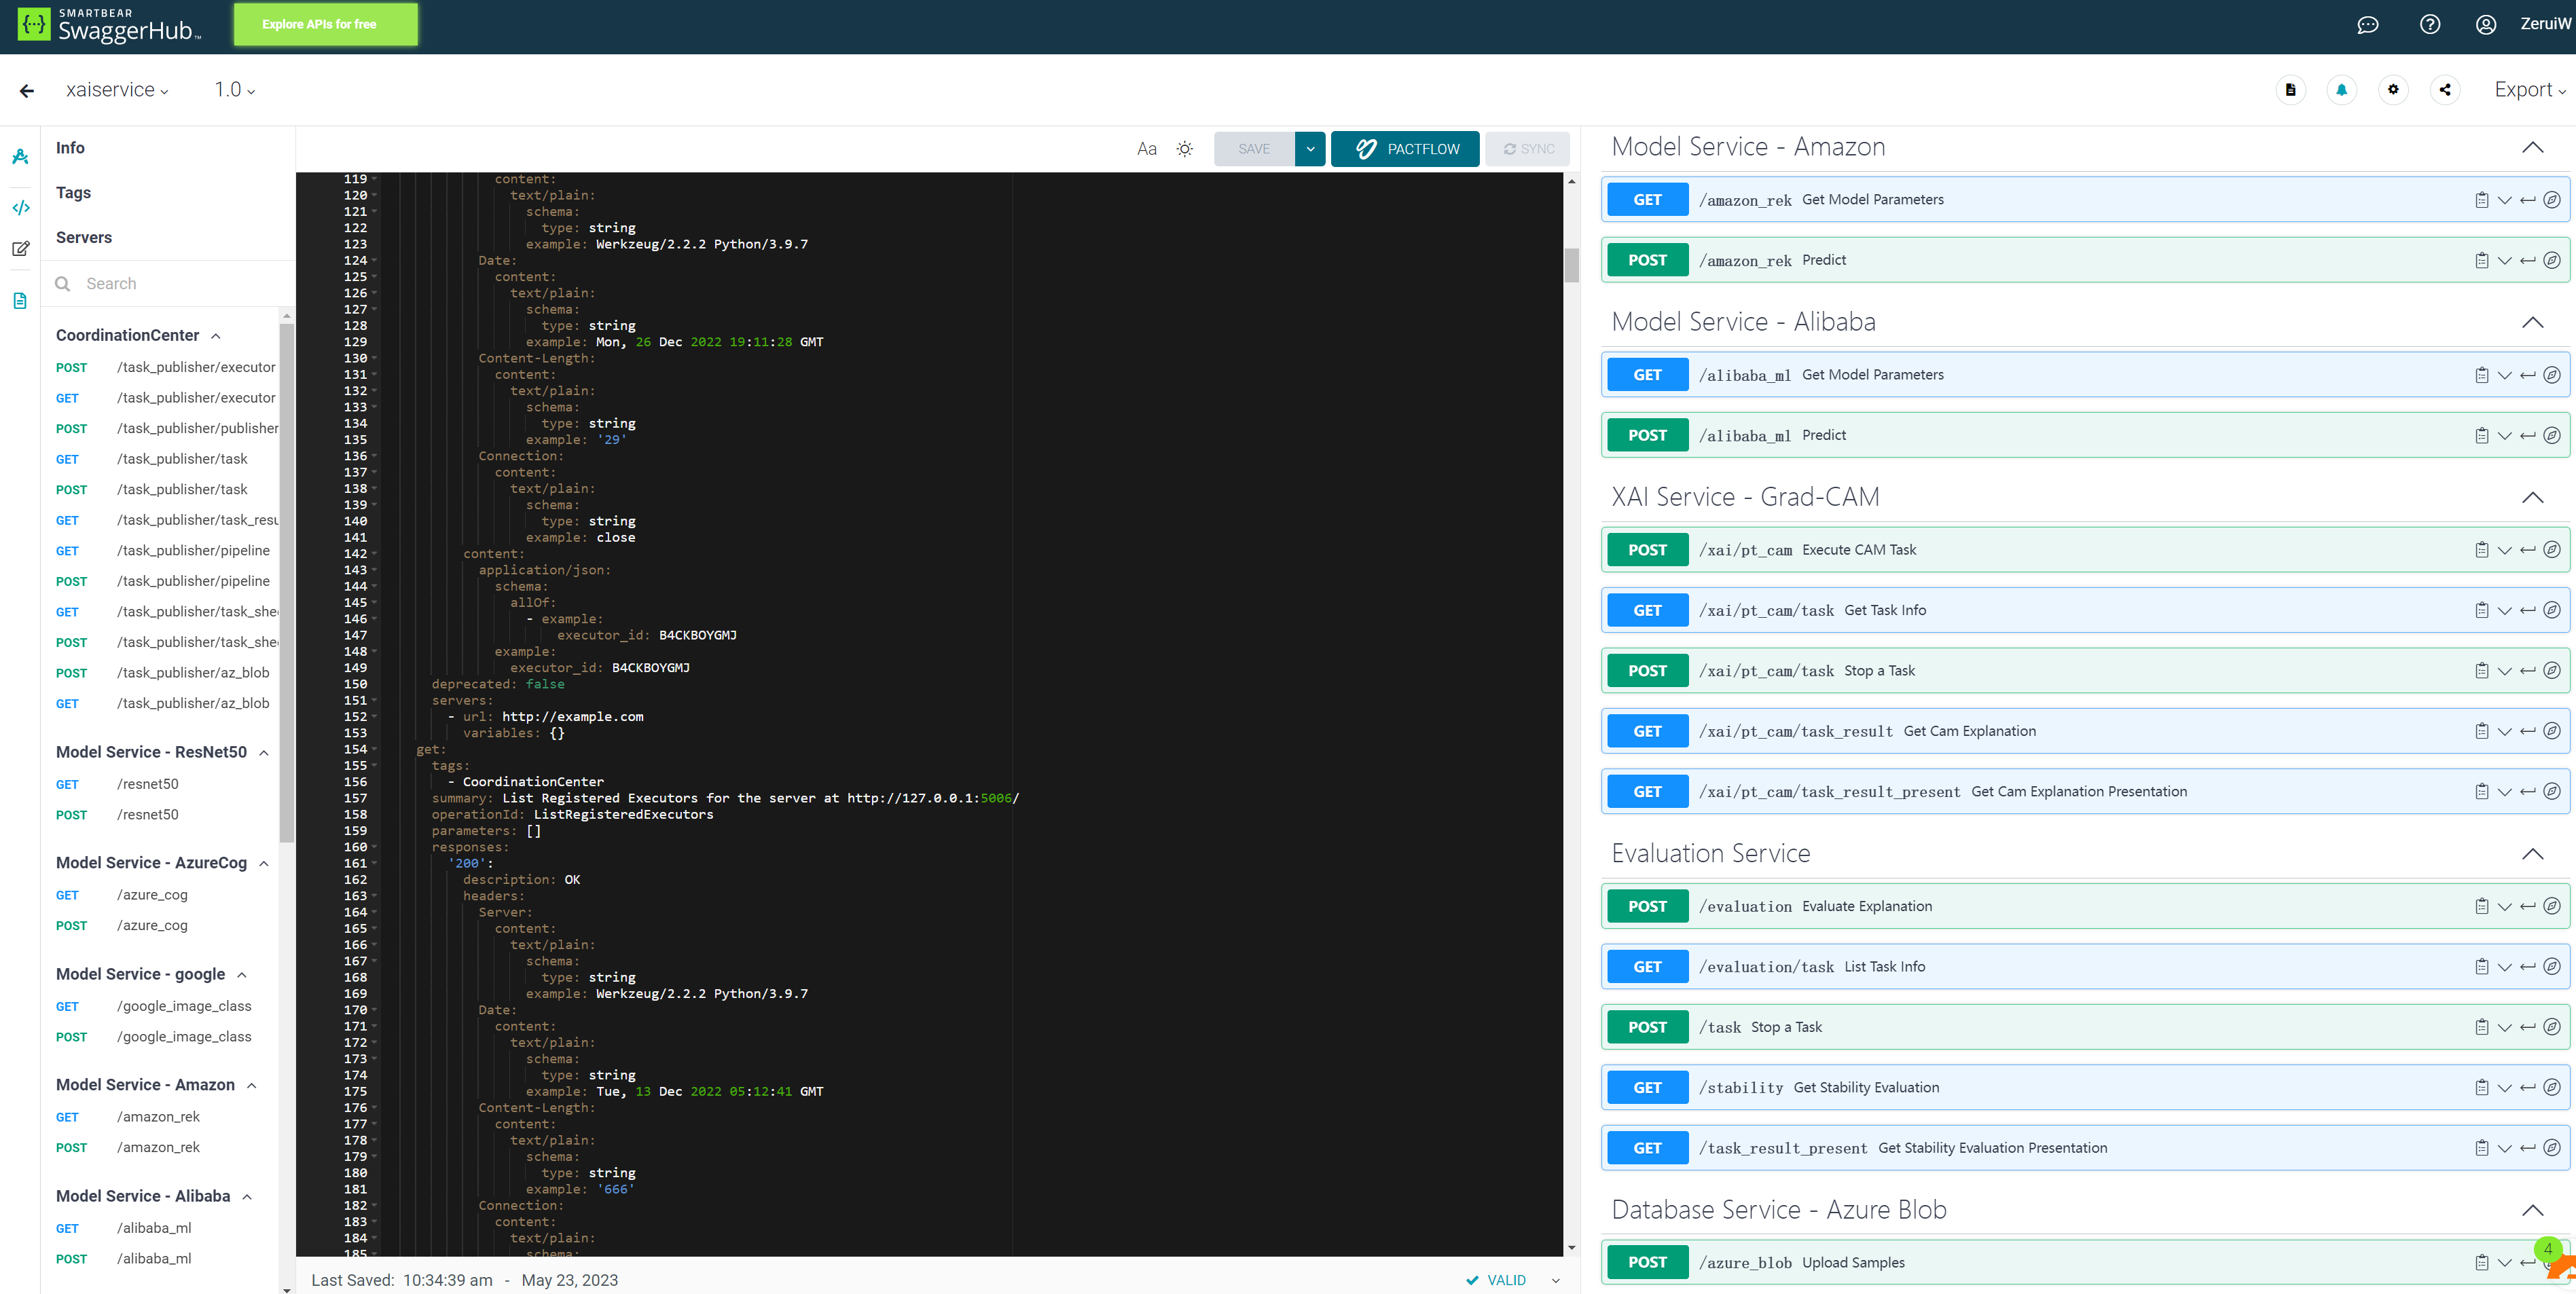
- Review and Save: After uploading, you'll see your API documentation in a well-organized, interactive format. Review it and save it.
- Invite Team Members: You can invite team members to collaborate on your API by sharing the SwaggerHub API URL.
- Version Control: SwaggerHub provides built-in version control. You can create new versions of your API as your project evolves.
Once imported, your API documentation will be available in a user-friendly, interactive format. You can:
- View the list of API endpoints, models, and authentication methods.
- Test endpoints directly within the browser.
- Generate client SDKs in multiple languages.
A container is a sandboxed process running on a host machine that is isolated from all other processes running on that host machine. That isolation leverages kernel namespaces and cgroupsopen_in_new, features that have been in Linux for a long time. Docker makes these capabilities approachable and easy to use. To summarize, a container:
- Is a runnable instance of an image. You can create, start, stop, move, or delete a container using the Docker API or CLI.
- Can be run on local machines, virtual machines, or deployed to the cloud.
- Is portable (and can be run on any OS).
- Is isolated from other containers and runs its own software, binaries, configurations, etc.
If you're familiar with chroot, then think of a container as an extended version of chroot. The filesystem comes from the image. However, a container adds additional isolation not available when using chroot.
A running container uses an isolated filesystem. This isolated filesystem is provided by an image, and the image must contain everything needed to run an application - all dependencies, configurations, scripts, binaries, etc. The image also contains other configurations for the container, such as environment variables, a default command to run, and other metadata.
Prerequisites:
- Prepared and Tested Flask application
- An Azure account
- A GitHub account
a. Go to the Azure Portal: https://portal.azure.com/
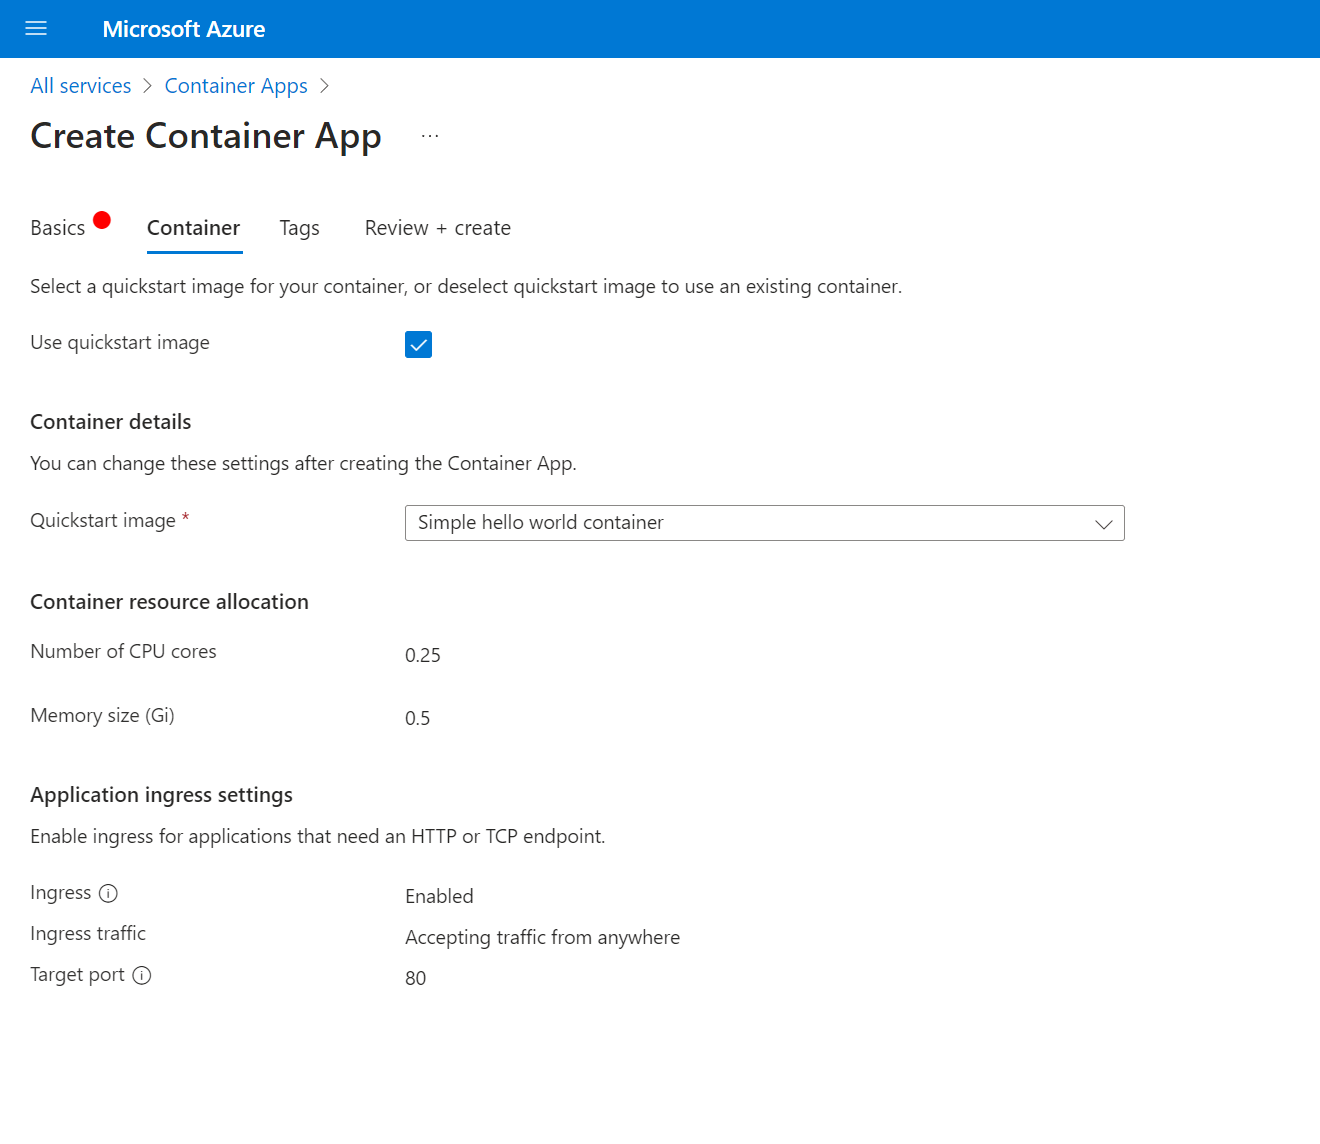
b. Create a new resource, select Web App.
c. Fill in the necessary information:
Azure for Students (you can create a new one if needed)
Name (this is the name of your application)
Publish: Code
Runtime stack: Python 3.8
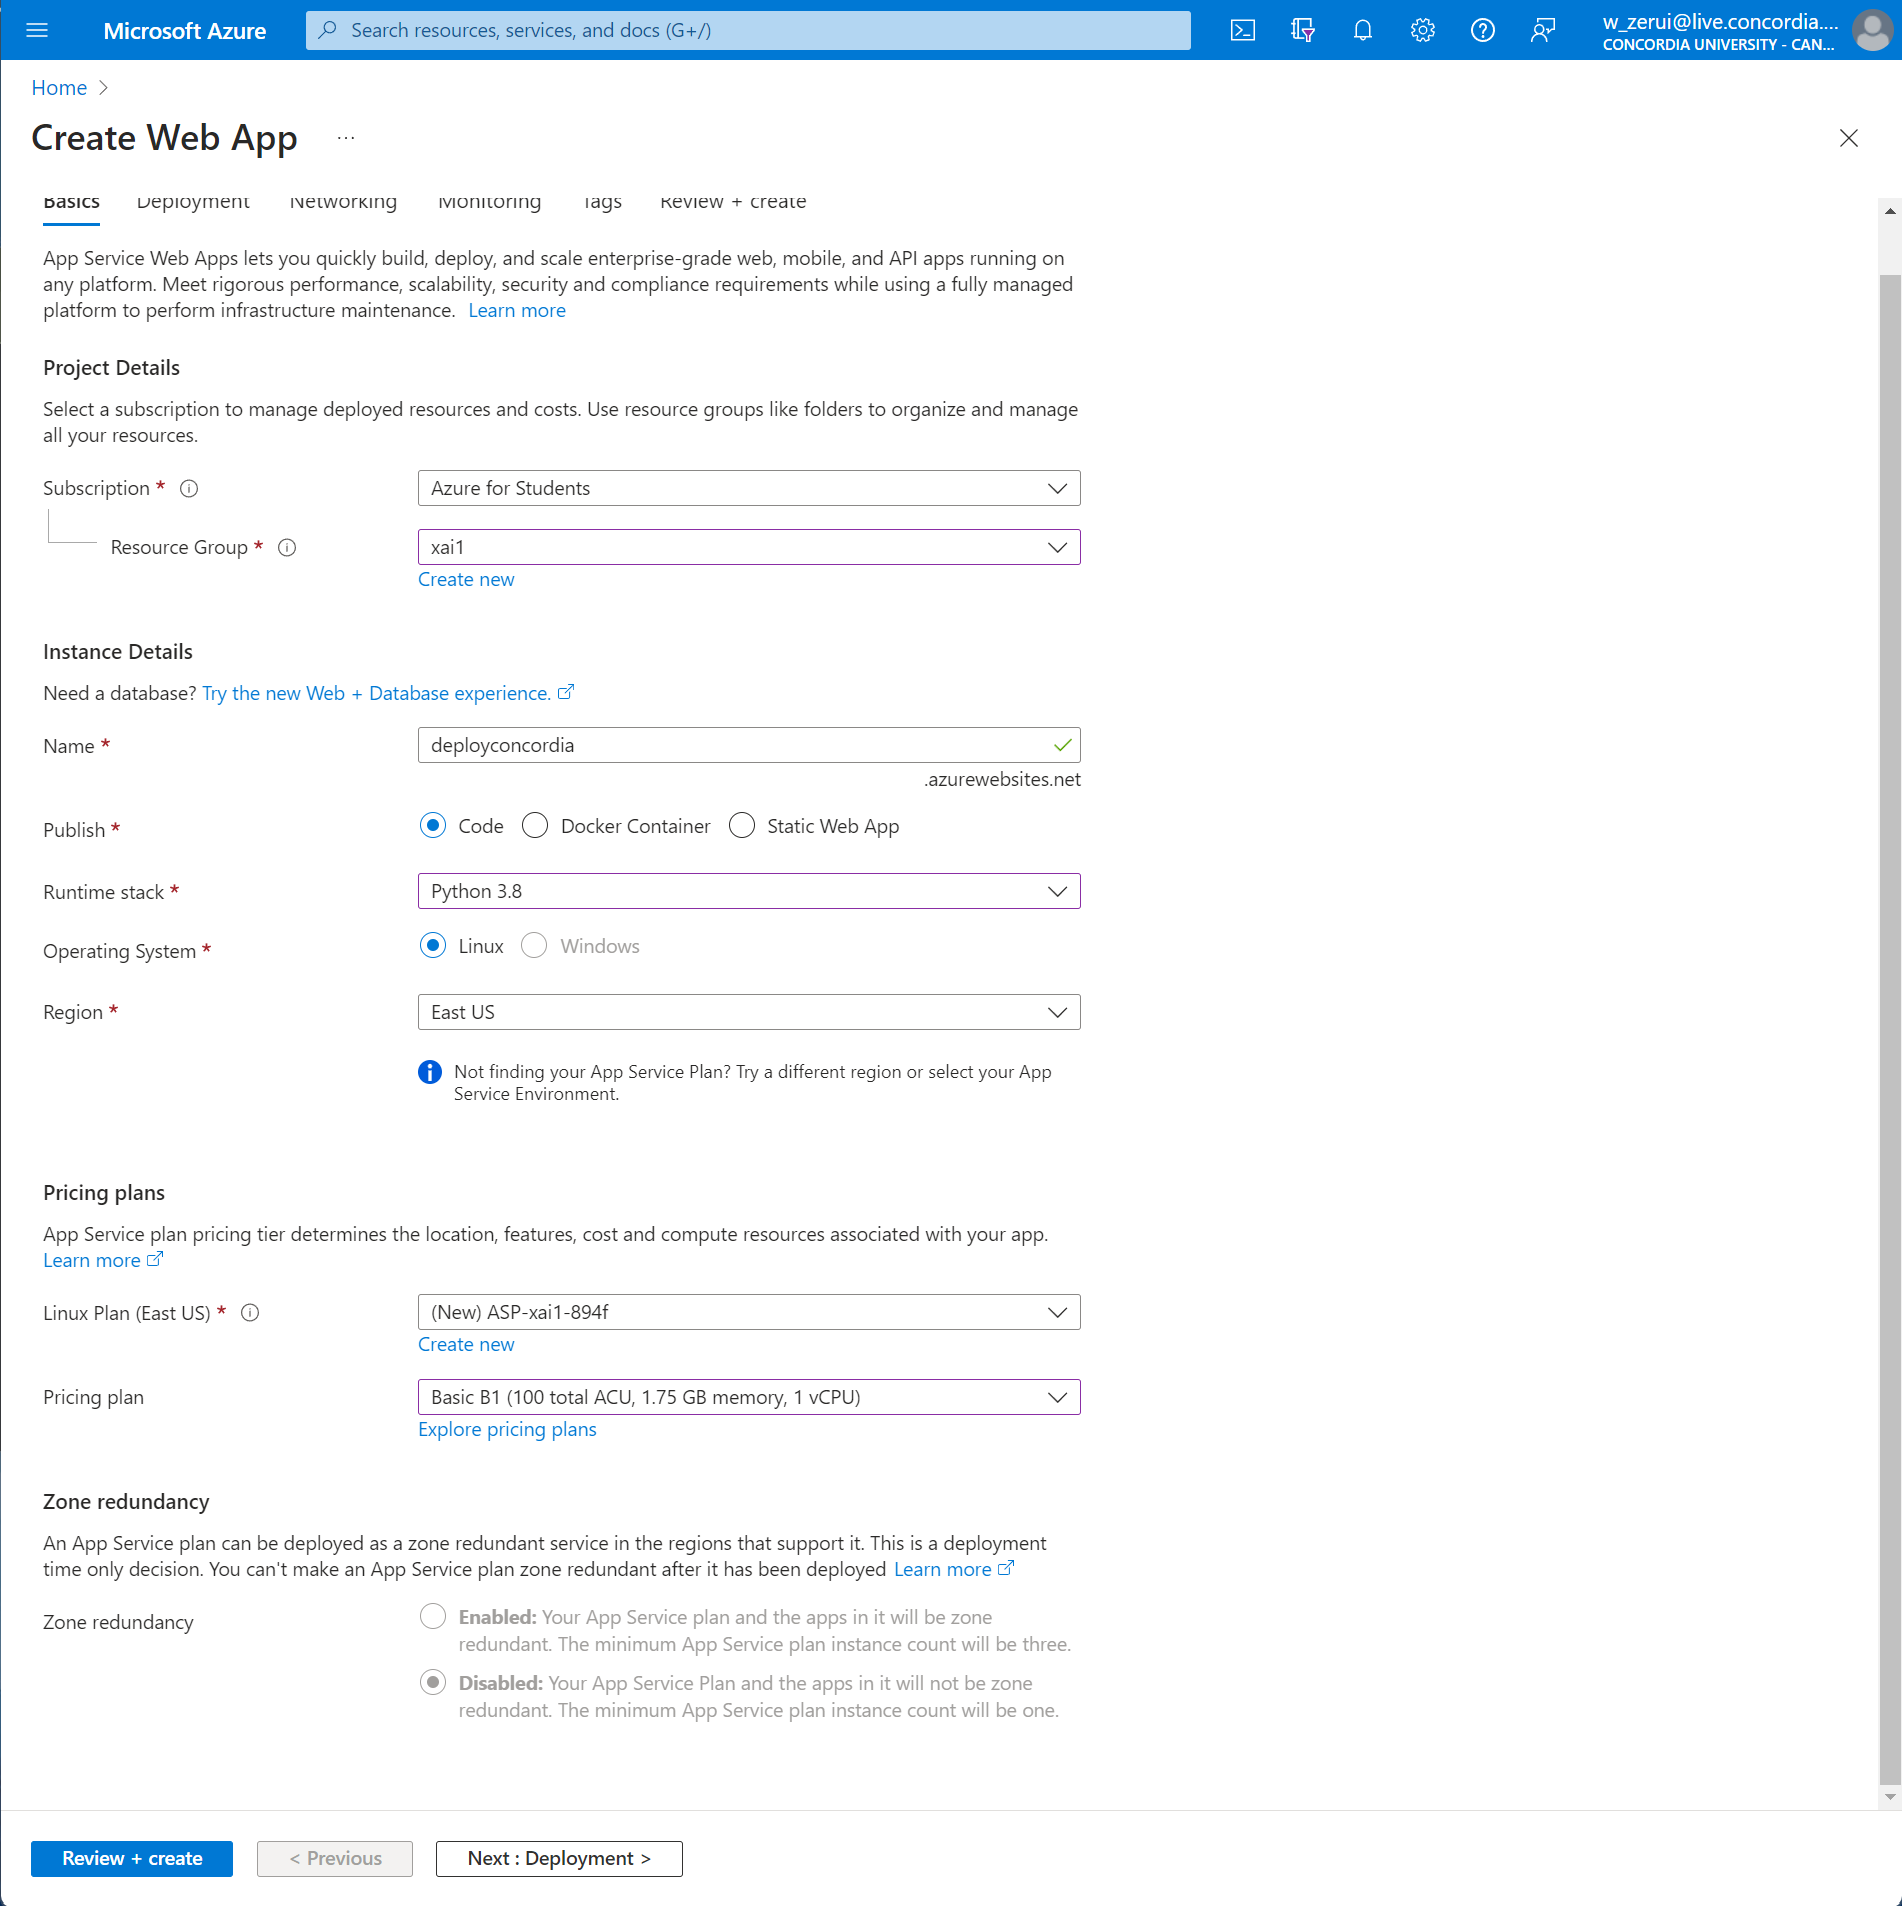
Review and click on Create.
a. Make sure you have a requirements.txt file in your Flask app directory with all the necessary packages.
b. Add a file named startup.txt and inside, put:
gunicorn --bind=0.0.0.0 --timeout 600 <your_flask_app_name>:app
Replace <your_flask_app_name> with the name of your Flask script (without the .py).
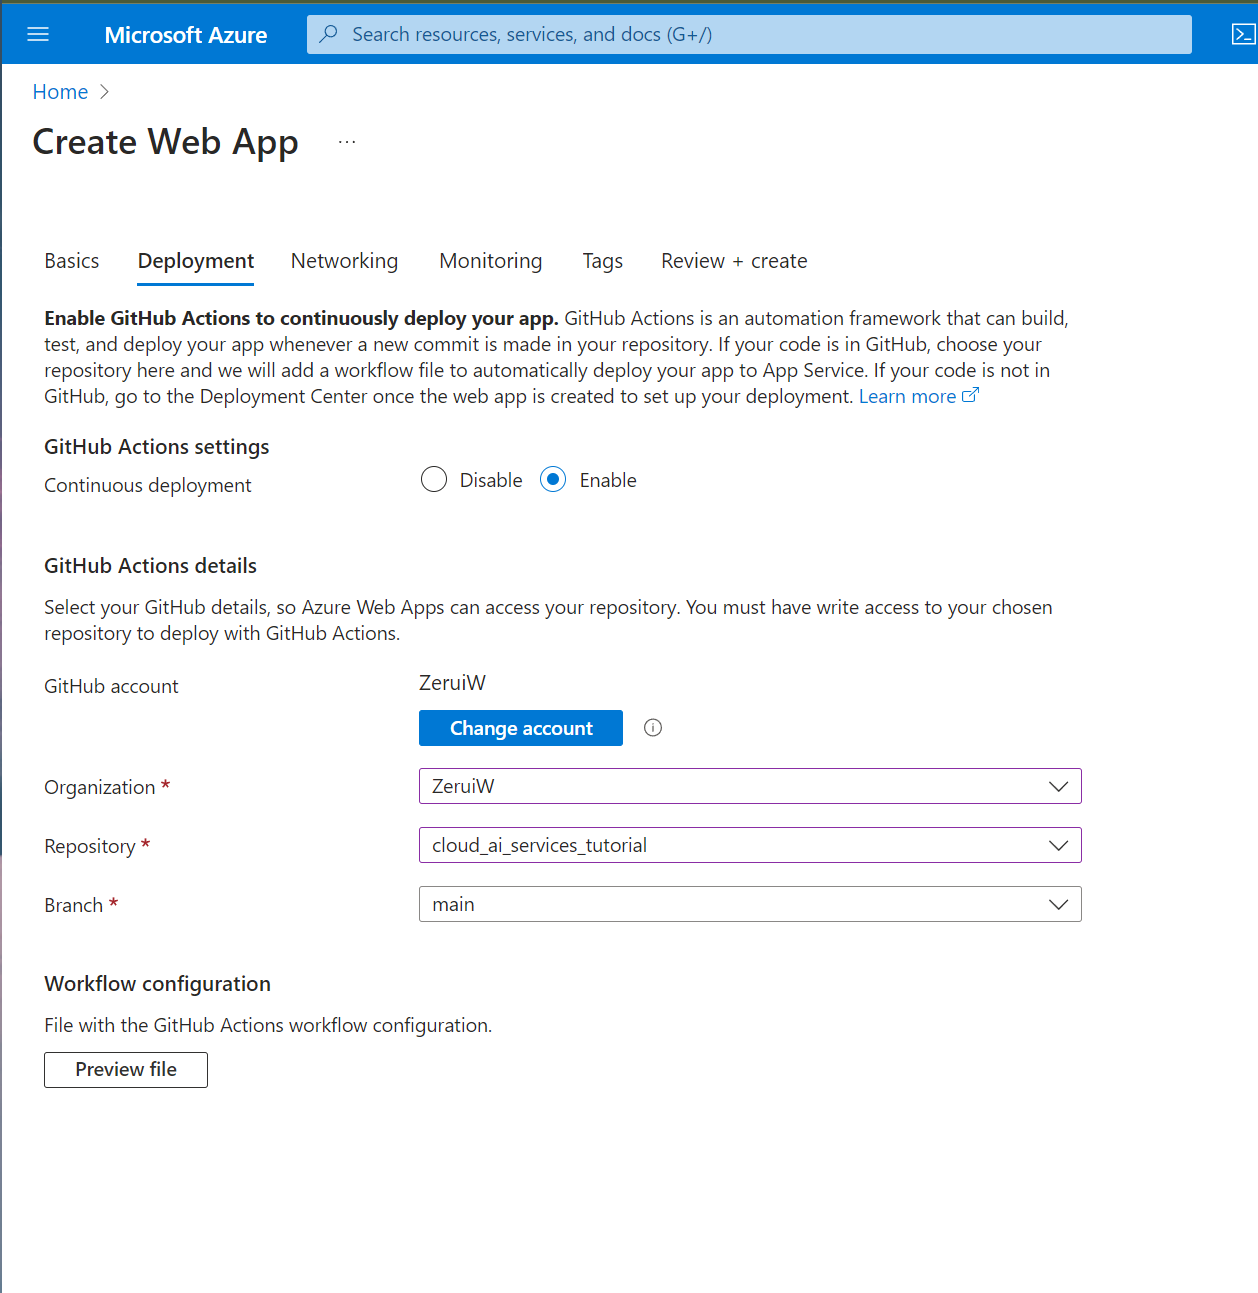
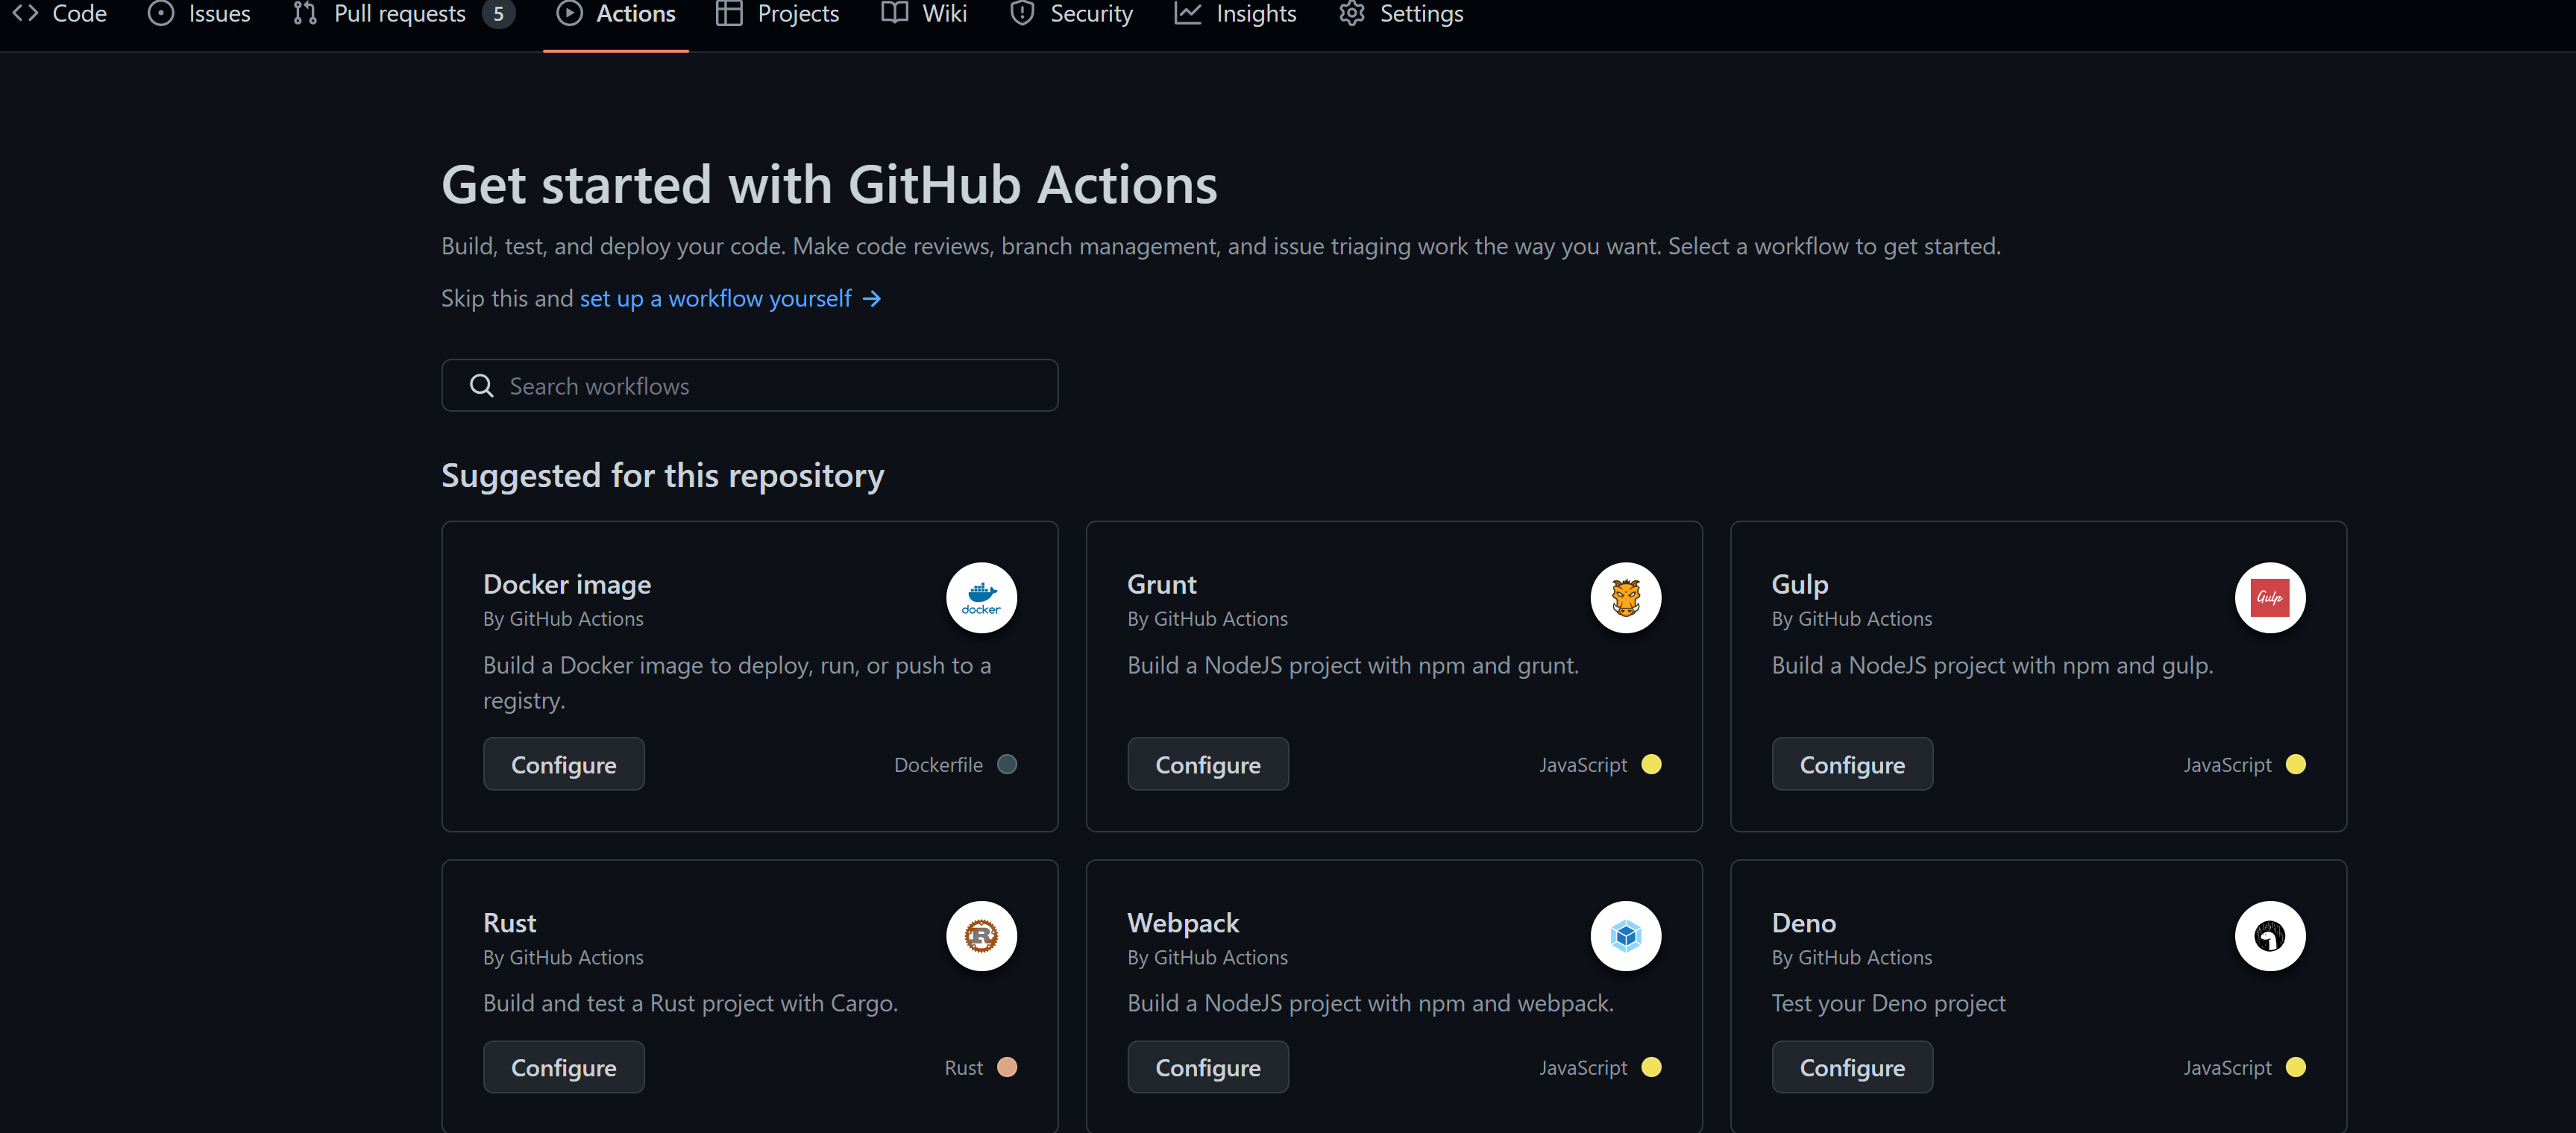
a. Go to your Flask application repository on GitHub.
b. Click on the "Actions" tab.
c. Click on "Set up a workflow yourself".
d. Replace the content with the following YAML configuration:
name: Deploy to Azure Web App

on:
  push:
    branches:
      - main  # Adjust this if your primary branch is not 'main'

jobs:
  build-and-deploy:
    runs-on: ubuntu-latest

    steps:
    - name: Checkout repository
      uses: actions/checkout@v2

    - name: Set up Python version
      uses: actions/setup-python@v2
      with:
        python-version: 3.8  # Adjust to your app's Python version

    - name: Install dependencies
      run: |
        python -m pip install --upgrade pip
        pip install -r requirements.txt

    - name: Deploy to Azure Web App
      uses: azure/webapps-deploy@v2
      with:
        app-name: <your_azure_web_app_name>
        publish-profile: ${{ secrets.AZURE_WEBAPP_PUBLISH_PROFILE }}
        package: .
Replace <your_azure_web_app_name> with the name you chose on Azure.
In your GitHub repository, go to the Settings tab, then Secrets. Click on New repository secret. Name it AZURE_WEBAPP_PUBLISH_PROFILE. For its value, you'll need to get the publish profile from Azure.
Go back to Azure Portal, navigate to your Web App, and click on Get publish profile. This will download an XML file. Open that XML file and copy its entire content. Paste this content as the value for your GitHub secret.
Commit and push this GitHub Action. Every time you push to your main branch, the action will deploy your Flask app to Azure.
Test your Deployment:
a. After pushing to your main branch and allowing the GitHub Action to run, your app should be deployed.
b. Go to <your_azure_web_app_name>.azurewebsites.net to see your live Flask app!
That's it!
In this section of the tutorial, we'll walk through the process of packaging your FastAPI server as a Docker image and uploading it to the Azure Container Registry (ACR).
- You should have Docker installed on your local machine.
- You should have Azure CLI (
az) installed. - Azure account and access to the Azure Portal.
-
Create a Dockerfile: Create a file named
Dockerfilein the root directory of your project.# Use an official Python runtime as a parent image FROM python:3.9-slim # Working directory WORKDIR /app # Copy the current directory contents into the container at /app COPY . /app # Install FastAPI and Uvicorn RUN pip install fastapi uvicorn # Run Uvicorn when the container launches CMD ["uvicorn", "main:app", "--host", "0.0.0.0", "--port", "8000"]Replace
main:appwith the appropriate import statement based on your FastAPI app’s location. -
Build Docker Image: Navigate to the folder containing your
Dockerfileand run the following command.docker build -t fastapi_app . -
Test Locally: After building the image, run it locally to test.
docker run -p 8000:8000 fastapi_app
Visit http://localhost:8000/docs to see if your FastAPI application is running inside a Docker container.
-
Login to Azure Account: Run the following command to login.
az login -
Create a Container Registry: Navigate to the Azure Portal, and create a new Azure Container Registry (ACR).
-
Authenticate Docker with ACR: Replace
<acr_name>with the name of your Azure Container Registry.az acr login --name <acr_name> -
Tag the Image: Before pushing, tag your Docker image using the ACR login server name which you can find in the Azure Portal under your ACR resource.
docker tag fastapi_app <acr_login_server>/fastapi_app:v1 -
Push Docker Image: Push the Docker image to the ACR.
docker push <acr_login_server>/fastapi_app:v1
We covered how to Dockerize a FastAPI application and push it to the Azure Container Registry. This containerized application is now ready to be deployed to various Azure services like Azure App Service for Containers.
With your FastAPI server now available as a Docker image in the Azure Container Registry, you can easily deploy it in a scalable and manageable way, taking full advantage of Azure's cloud infrastructure.
Here is the officials document to push your image to your Azure container registry using the Docker CLI https://learn.microsoft.com/en-us/azure/container-registry/container-registry-get-started-docker-cli?tabs=azure-cli
Once your Docker image is successfully pushed to Azure Container Registry (ACR), the next step is to deploy it to an Azure service. In this part of the tutorial, there are two options for deploying your containerized application: via the Azure Portal or using the Azure CLI (Command Line Interface).
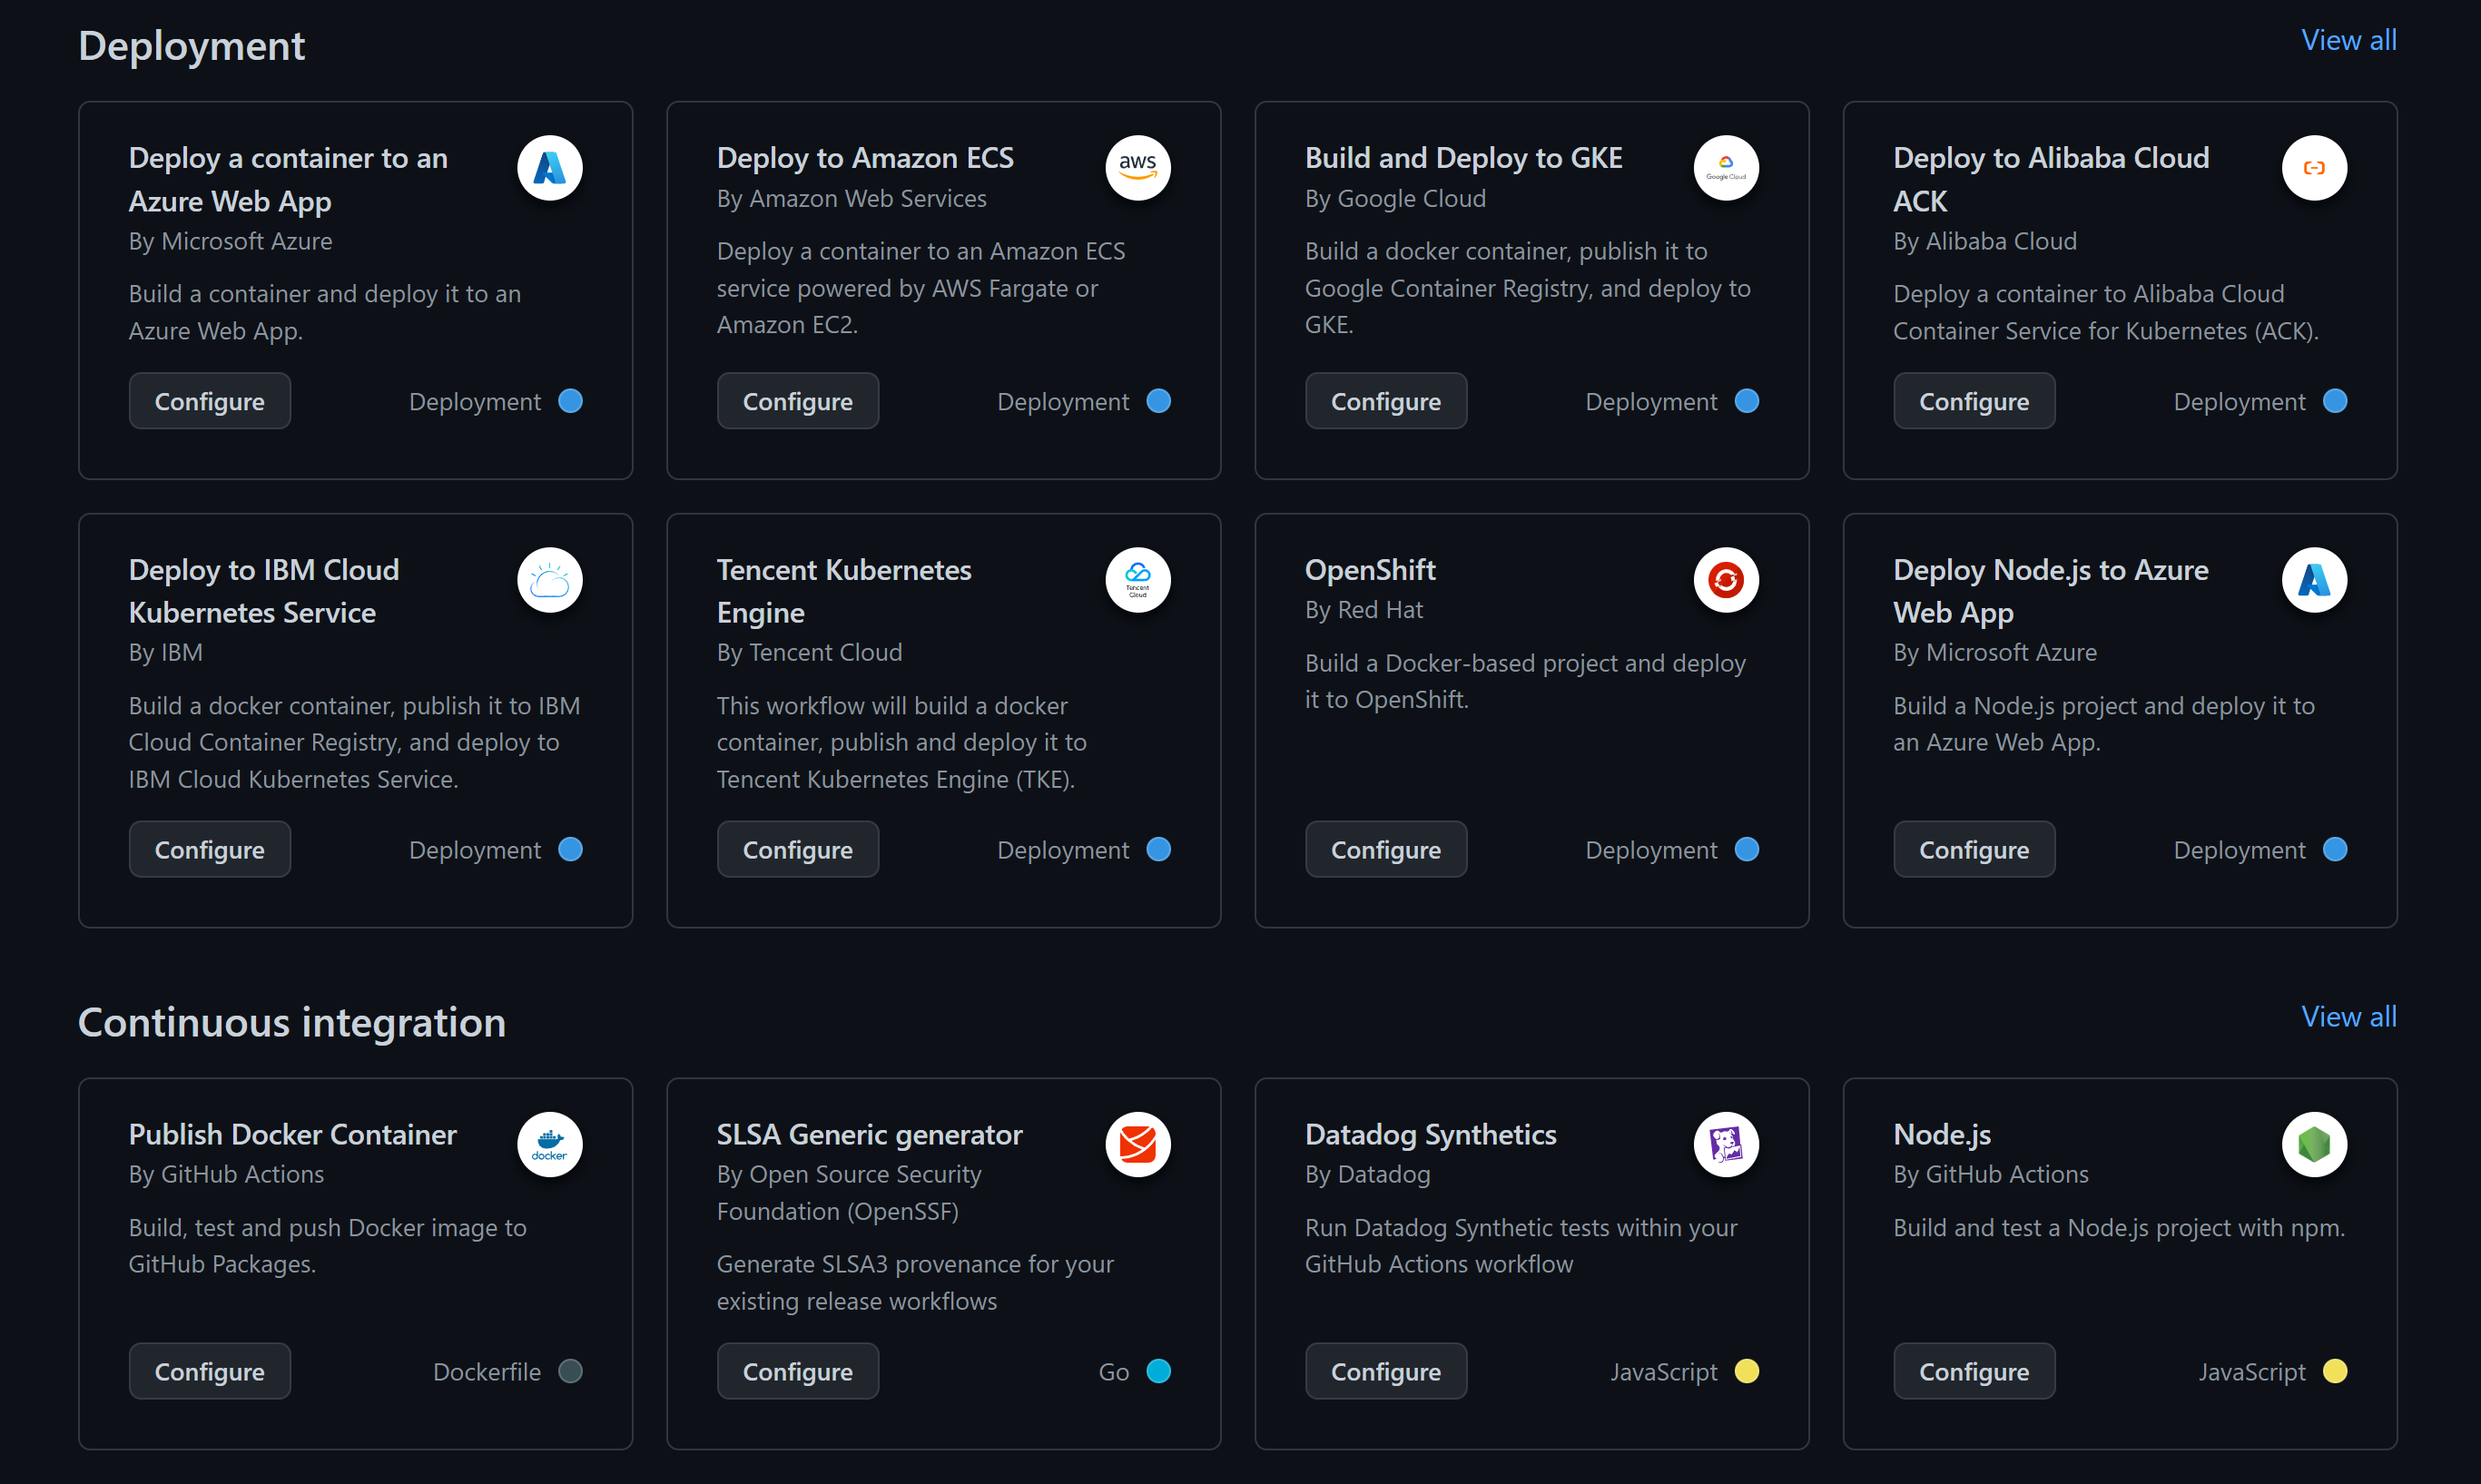
- Navigate to the Azure Portal: Open your browser and log in to your Azure account.
- Choose Service: Navigate to the service where you want to deploy your Docker image. This could be Azure App Service. For many microservices, Azure Kubernetes Service (AKS) could also be an option.
- Configure Settings:
- For AKS: Select your AKS cluster and navigate to the
Containerstab. Choose the image source asAzure Container Registry, and select your image and tag. - For Azure App Service: Go to
Container settingsunder the Web App settings. SelectAzure Container Registryand then choose your image and tag.
- For AKS: Select your AKS cluster and navigate to the
- Deploy: Click on the
SaveorApplybutton to deploy your image. - Verify Deployment: Once the deployment is complete, you'll receive a URL for your deployed service. Navigate to it to verify your FastAPI application is running as expected.
- Azure CLI (
az) installed and authenticated. - Azure Container Registry (ACR) with the Docker image pushed.
- Azure App Service set up (depending on where you're deploying).
-
Create Web App: If you haven't already, create a new Web App for Containers.
az webapp create --resource-group <ResourceGroup> --plan <AppServicePlan> --name <AppName> --deployment-container-image-name <acr_login_server>/fastapi_app:v1 -
Configure App Service: Update the container settings to pull from the ACR.
az webapp config container set --name <AppName> --resource-group <ResourceGroup> --docker-custom-image-name <acr_login_server>/fastapi_app:v1 --docker-registry-server-url https://<acr_login_server> -
Restart App Service: To make sure the changes take effect.
az webapp restart --name <AppName> --resource-group <ResourceGroup> -
Verify Deployment: Once deployed, navigate to the Web App's URL to make sure your FastAPI application is running.
By now, you should have a comprehensive understanding of how to build, containerize, and deploy a FastAPI application on Azure, taking full advantage of the robust features offered by Azure services.
Continuously integrating and deploying (CI/CD) your FastAPI application allows for quicker development cycles, early bug discovery, and faster delivery of features. In this section, we'll employ GitHub Actions to automate the build, test, and deployment processes for your application.
- A GitHub repository containing your FastAPI application's source code.
- Azure Container Registry (ACR) to store your application's Docker image.
- Azure App Service as the deployment target for your application.
- Go to your GitHub repository and navigate to
Settings > Secrets > New repository secret. - Add the following secrets to securely store your Azure and ACR credentials:
AZURE_REGISTRY_USERNAME: Username for Azure Container RegistryAZURE_REGISTRY_PASSWORD: Password for Azure Container RegistryAZURE_CREDENTIALS: Azure service principal credentials in JSON format.
- In your GitHub repository, navigate to the
.github/workflows/directory. If it doesn't exist, create it. - Create a new YAML file inside this directory, for example,
ci-cd.yaml. - Paste the following YAML code into the
ci-cd.yamlfile:
name: CI/CD Pipeline to Azure App Service

on:
  push:
    branches:
      - main  # Replace if your primary branch is named differently

env:
  AZURE_REGISTRY_URL: <Your_ACR_Login_Server>
  APP_NAME: fastapi_app

jobs:
  build-and-push-to-acr:
    runs-on: ubuntu-latest

    steps:
    - uses: actions/checkout@v2

    - name: Log in to Azure Container Registry
      run: echo "${{ secrets.AZURE_REGISTRY_PASSWORD }}" | docker login ${{ env.AZURE_REGISTRY_URL }} -u ${{ secrets.AZURE_REGISTRY_USERNAME }} --password-stdin

    - name: Build and Push Image to ACR
      run: |
        docker build -t ${{ env.AZURE_REGISTRY_URL }}/${{ env.APP_NAME }}:latest .
        docker push ${{ env.AZURE_REGISTRY_URL }}/${{ env.APP_NAME }}:latest

  deploy-to-app-service:
    needs: build-and-push-to-acr
    runs-on: ubuntu-latest

    steps:
    - name: Azure Login
      uses: azure/login@v1
      with:
        creds: ${{ secrets.AZURE_CREDENTIALS }}

    - name: Deploy to Azure App Service
      run: |
        az webapp config container set --name <Your_App_Service_Name> --resource-group <Your_Resource_Group> --docker-custom-image-name ${{ env.AZURE_REGISTRY_URL }}/${{ env.APP_NAME }}:latest
Replace the placeholders like <Your_ACR_Login_Server>, <Your_Resource_Group>, and <Your_App_Service_Name> with your specific Azure information.
Save and commit this file to your GitHub repository.
By adding this GitHub Actions workflow, each push to the main branch will automatically trigger a build of your FastAPI application's Docker image. The image will be pushed to Azure Container Registry and then deployed to your Azure App Service instance. This setup streamlines your development workflow, making it more efficient and reliable.